Friday, April 22, 2011

Resurrection Rolls

This fun and educational recipe came from my MOPS group.  These rolls are so easy and quick to make, perfect for young kids to help with!

Start with your ingredients...a can of crescent rolls, marshmallows, melted butter, cinnamon & sugar, that's it!

After dipping them in melted butter, roll the marshmallows in some cinnamon and sugar...

Place one marshmallow on one triangle of crescent dough...

Roll them up...

Make sure all the seams are pinched together well...isn't Matthew such a big boy helper??

Bake...

Let cool for just a bit...

Break open the tomb, and the body of Christ is no longer there!

Resurrection Rolls

1 can refrigerated crescent rolls
8 large marshmallows
Melted butter (about 2 Tbs.)
Cinnamon & sugar mixture

Give each child one triangle shaped section of crescent roll.  This represents the tomb.  Each child takes one marshmallow which represents the body of Christ.  Dip the marshmallow in the butter and roll in cinnamon and sugar mixture.  This represents the oils and spices the body was anointed with upon burial.  Lay the marshmallow on the dough and carefully wrap it around the marshmallow.  Make sure all seams are pinched together well.  (Otherwise the marshmallow with "ooze" out of the seams.)  Bake according to package directions and cool.  Break open the tomb and the body of Christ is no longer there!!

Enjoy and Happy Easter!

Tuesday, April 19, 2011

M makes J Laugh

Short/cute video of Matthew making Jacob laugh...Jacob really gets going when he laughs! :)

The Babysitter is Back!

Always a hit with the bambinos!  The excersaucer is great entertainer.  Jacob loves it as much as Matthew did.


April Warmth??

Hard to believe that just over a week ago it was in the mid-eighties, and I took the boys outside for a fun photo-op in their matching swimsuits.  Where did the nice weather go?  Is it spring still?  Crazy weather in the Midwest is all I have to say.  Here's hoping for warmer weather soon!

The boys in their suits...


Jacob has also been cute lately as he has discovered his feet...

Egg Decorating

Well, only almost two weeks late, but without further adieu, here are some pics from the Easter egg decorating at Grandma and Grandpa Doherty's house.  Matthew is just old enough to really want to participate and color eggs.  It was really cute watching him have fun. :)


Sunday, April 10, 2011

Spring/Easter Colorburst Cupcakes


These cupcakes are absolutely so much fun to make, adorable, and yummy to boot!  I can't take complete credit for them, as my inspirations were these cupcakes on Our Best Bites blog.  I intended the layer of colors to be more pastel (in keeping with a Spring/Easter theme), but I got a little happy with the coloring gel, and made them too dark.  Especially the top layer which should have been a pretty pink. ;)  None the less, they turned out really cute, and we all enjoyed them.  There is just something about all the color that brightens your day...  Here's how you make'em:

Start by using some good food coloring gel (normal food coloring won't produce as vibrant a color)...

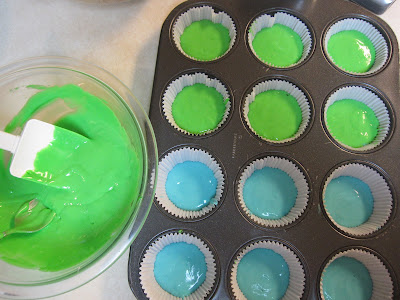
When you have your batter mixed, divide it equally into 4 bowls, add the food coloring gels, and mix well...

Next you layer each color (about a generous 2 tsp. of each) in plain white cupcake holders.  I started with the blue, and made my way up the rainbow...

Almost done!  I did fill these maybe a little more than I should...

Here is one baked...you can see the colors through the liner!

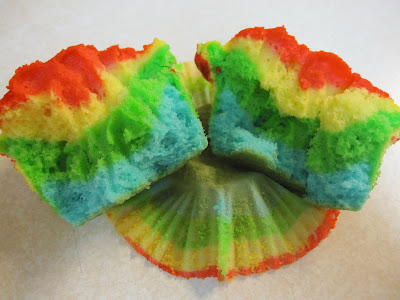
The inside is really pretty...

Frost with a Wilton 1M tip, sprinkle on some Spring/Easter confetti sprinkles, and voila!  Major cute cupcake!

Here is the recipe...

Spring/Easter Colorburst Cupcakes

1 white cake mix
2 eggs
1 C yogurt (any smooth textured fruit flavor is fine!) or sour cream
1/2 C milk
1/3 C vegetable oil

Combine all ingredients until incorporated (about 30 seconds). Scrape sides of bowl and then beat on med-high speed for 2 minutes.

Divide batter according to how many colors you are using. I used 4 colors and it worked out to a little over 1 cup for each color, but each cake brand will be slightly different.

Use food coloring to color batter to desired intensity.

To get a layered stripe like I used, you’ll want to put a spoonful of each color in the cupcake one at a time. The batter is thick, so it won’t spread on it’s own. A great tip is to set out a little bowl of water where you’re working. Dip your finger in the water and then gently spread the batter out. The water will make it so the batter doesn’t stick to your fingers.

Another tip is to use a measuring spoon and some water to measure out how many teaspoons/tablespoons are going to fit in your cupcake. Then divide that by how many colors you have so you know how much of each color to use for each cupcake. For my 4 colors, it worked out perfectly with 2 tsp. of each color in each cupcake. So I put in 2 tsp. of blue in the bottom of each cupcake and spread it out with my finger. Then I put in 2 tsp. of green on top of that, then yellow, etc.

Bake them according to the package directions, until a toothpick comes out dry.

I topped mine with this frosting.  I doubled the recipe for the frosting, and it worked out perfectly for my 16 cupcakes.  I used a Wilton 1M tip to frost.  This is a great frosting...so light and fluffy!

Taste of Home Cooking Show

This past Tuesday I had the unique opportunity to help out at a Taste of Home Cooking Show.  My good friend Inger Plummer was the coordinator/organizer for the show.  I helped as a stage hand both before and during the show.  It was an absolute blast!  I just can't believe I never took any pics of the food!  It was a whirl wind of busyness. 

The Stage...


Inger and I before the show...

Inger going through all the give-aways for the show, counting to make sure they were all there!

The crowd piling in...1000 people, and it was sold out!

Culinary Specialist Dana Elliott during the show...

Monday, April 4, 2011

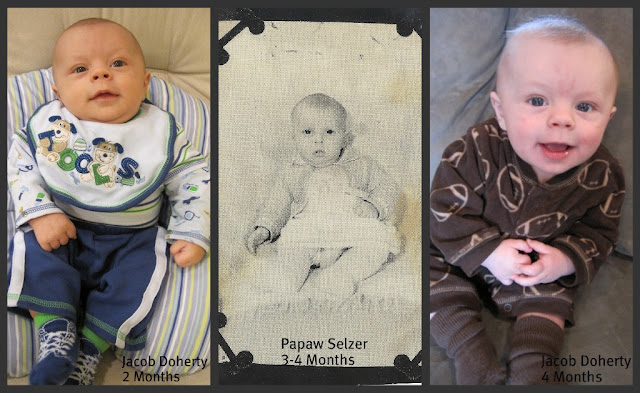
Jacob/Papaw

Though the quality of the scanned in photo of my father isn't the best, the resemblance is amazing!

Friday, April 1, 2011

Yummy Lunch

Yesterday we took a trip into Chicago and went to lunch at Cemitas Puebla.  It was fantastic!  The place was recommended by some High School friends of mine a few weeks ago, and come to find out the place was featured on Food Network's "Diner's, Drive-ins, and Dives", and on the local PBS show "Check Please!".  They feature the cemita sandwich, which was quite tasty and filling!  You can watch the video's from the two shows on their website describing the food.  Very worth the drive, and we plan to go back someday.

The Atomica Cemita...

The Carne Asada Cemita...

Chris and Matthew enjoying Cemitas Puebla!

M&J Videos

Here are a couple recent cute video's of the boys.  The first one is sweet of Matthew showing Jacob his "owie" on his finger...


This second video is of Matthew at bed time.  He is "pointing out" his family in his Pre-School Bible.  Apologies to those who were not included.  My camera memory card was full.  It is hilarious.