Sunday, April 10, 2011
Spring/Easter Colorburst Cupcakes
These cupcakes are absolutely so much fun to make, adorable, and yummy to boot! I can't take complete credit for them, as my inspirations were these cupcakes on Our Best Bites blog. I intended the layer of colors to be more pastel (in keeping with a Spring/Easter theme), but I got a little happy with the coloring gel, and made them too dark. Especially the top layer which should have been a pretty pink. ;) None the less, they turned out really cute, and we all enjoyed them. There is just something about all the color that brightens your day... Here's how you make'em:
Start by using some good food coloring gel (normal food coloring won't produce as vibrant a color)...
When you have your batter mixed, divide it equally into 4 bowls, add the food coloring gels, and mix well...
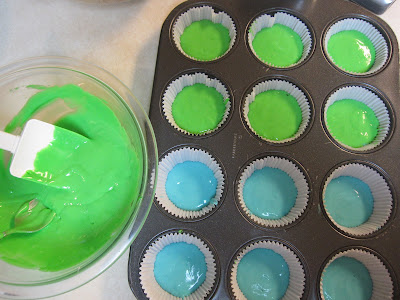
Next you layer each color (about a generous 2 tsp. of each) in plain white cupcake holders. I started with the blue, and made my way up the rainbow...
Almost done! I did fill these maybe a little more than I should...
Here is one baked...you can see the colors through the liner!
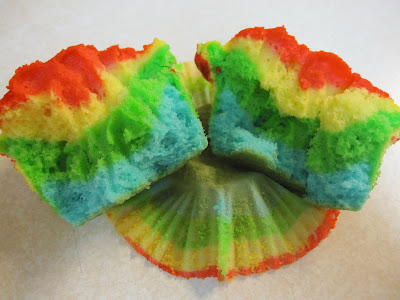
The inside is really pretty...
Frost with a Wilton 1M tip, sprinkle on some Spring/Easter confetti sprinkles, and voila! Major cute cupcake!
Here is the recipe...
Spring/Easter Colorburst Cupcakes
1 white cake mix
2 eggs
1 C yogurt (any smooth textured fruit flavor is fine!) or sour cream
1/2 C milk
1/3 C vegetable oil
Combine all ingredients until incorporated (about 30 seconds). Scrape sides of bowl and then beat on med-high speed for 2 minutes.
Divide batter according to how many colors you are using. I used 4 colors and it worked out to a little over 1 cup for each color, but each cake brand will be slightly different.
Use food coloring to color batter to desired intensity.
To get a layered stripe like I used, you’ll want to put a spoonful of each color in the cupcake one at a time. The batter is thick, so it won’t spread on it’s own. A great tip is to set out a little bowl of water where you’re working. Dip your finger in the water and then gently spread the batter out. The water will make it so the batter doesn’t stick to your fingers.
Another tip is to use a measuring spoon and some water to measure out how many teaspoons/tablespoons are going to fit in your cupcake. Then divide that by how many colors you have so you know how much of each color to use for each cupcake. For my 4 colors, it worked out perfectly with 2 tsp. of each color in each cupcake. So I put in 2 tsp. of blue in the bottom of each cupcake and spread it out with my finger. Then I put in 2 tsp. of green on top of that, then yellow, etc.
Bake them according to the package directions, until a toothpick comes out dry.
I topped mine with this frosting. I doubled the recipe for the frosting, and it worked out perfectly for my 16 cupcakes. I used a Wilton 1M tip to frost. This is a great frosting...so light and fluffy!
Subscribe to:
Post Comments (Atom)


2 comments:
These rainbow color cupcakes are cool! I'm going to try to make these for my students.
So cute Beth - I love the bright colors!
Post a Comment